Email templates and categories
Solution No. 294
OVERVIEW
How to choose a default PDF template
How to choose a default email template
How to create a new email template
How to edit an existing email template
How to create a new email template category
How to edit an existing email template category
SCREEN OVERVIEW
Existing Email Templates List
New/Edit Email Template
New/Edit Email Template Category
Overview
Email templates allow you to quickly and efficiently create and send stock emails for different purposes within your business: one template might remind customers of an outstanding payment, while another might notify a Method user an activity has been assigned to them. Additionally, we offer stock PDF templates for printing transactions like estimates and invoices! Method comes preloaded with a number of templates, but you may want to create your own (or edit the stock templates) to better suit your business.
This section will describe how to do all of these things! Additionally, we'll discuss email template categories, which are used to organize email templates by their intended use. You will learn how to create and edit template categories in this section as well. Let's get started!
back to top
How to choose a default PDF template
Choosing stock PDF templates will set the default templates that are used when performing certain actions within Method.
- From the New Activity screen, click More > Choose email template. This opens the Choose Email Template screen.
- You will see two tabs: Default PDF templates and Default email templates. Click PDF templates.
 |
These templates will be used when you print or preview PDFs in Method CRM. You have the option to customize each of these templates with the Method Report Designer, and to learn more about this, we recommend you get in touch with a Business Solutions Specialist. For now, let's take a look at each of the template types.
- Check: Used when printing or previewing checks.
- Credit Memo: Used when printing or previewing credit memos.
- Estimate: Used when printing or previewing estimates.
- Invoice: Used when printing or previewing invoices.
- Purchase Order: Used when printing or previewing purchase orders.
- Sales Order: Used when printing or previewing sales orders.
- Sales Receipt: Used when printing or previewing receipts.
|
- Click Save & Close to save your changes.
The defaults you've set up here will be used whenever you take the actions described in the tip above.
back to top
How to choose a default email template
Choosing stock email templates will set the default templates that are used when sending emails (both manual and automatic) within Method.
- From the New Activity screen, click More > Choose email template. This opens the Choose Email Template screen.
- You will see two tabs: Default PDF templates and Default email templates. Click email templates.
 |
Default email templates only apply when a Save and Email button is clicked and Method automatically sends an email. You have the option to customize each of these templates with the Method Report Designer, and to learn more about this, we recommend you get in touch with a Business Solutions Specialist. For now, let's take a look at each of the template types.
- Estimate Notification: Sent when you click Email notification when saving on a new or edited estimate. This will be received by any contact listed on the account with opt out of billing unchecked.
- Invoice Notification: Sent when you click Email notification when saving on a new or edited invoice. This will be received by any contact listed on the account with opt out of billing unchecked.
- Payment Notification: Sent when you receive a payment from a customer, either via a portal or by creating a payment under Receive Payment. This will be received by any contact listed on the account with opt out of billing unchecked.
- Activity Notification: Sent to the Assigned To user when you create or edit an activity and assign it to them.
- Follow-up Notification: Sent to the Assigned To user when you create or edit a follow-up activity and assign it to them.
- Case Notification: Sent to the Assigned To user when you create or edit a case and assign it to them.
- Case Update Notification: Sent to the contact listed on the account when you create a case and click email case notification to contact when saving.
- Customer Edit: This is a confirmation email sent when a customer makes changes to his/her information through a portal, or if a Method user makes changes to that record internally. The user will receive this email regardless, and any contact listed on the account with email confirmation when saving checked.
- Contact Add: When a new contact is added, either in Method or through a portal, this confirmation email is sent to the user and to any contact listed on the account with email confirmation when saving checked.
- Contact Edit: When an existing contact is edited, either in Method or through a portal, this confirmation email is sent to the user and to any contact listed on the account with email confirmation when saving checked.
- Opportunity Notification: Sent to the Assigned To user when you create or edit an opportunity and assign it to them.
|
- Click Save & Close to save your changes.
The defaults you've set up here will be used whenever you take the actions described in the tip above.
back to top
How to create a new email template
- Click on the ellipses button (...) next to any email template to bring up the New/Edit Email Templates screen.
- Choose a name for your email template and type it into the Name field. This is the only required field on this screen.
- From here, you can choose to fill out any and all of the other fields on the screen, including filling in text that will automatically generate within the body of an email when you use this email template. If you wish to use Mail Merge options, please see the Mail Merge documentation.
- If you want this email template to appear in dropdown lists, ensure Is active? is checked off.
- Click Save to save the changes to the fields above, or Save & New to save the fields and then clear them.
Your new email template will now be available in dropdown lists throughout Method.
back to top
How to edit an existing email template
- Click on the ellipses button (...) next to any email template to bring up the New/Edit Email Templates screen.
- To the left of the screen, choose the email template you wish to edit from the Existing Email Templates List. Click Select next to your chosen template. This will auto-fill the fields to the right of the screen.
- From here, you can make any changes you see fit: change the name, add Mail Merge functionality, reassign the template, et cetera.
 |
If you choose to Delete email template, you will receive a prompt asking if you are sure you want to delete the template. This can't be undone, so make sure it's what you want to do. |
- Click Save to save the changes to the fields above, or Save & New to save the fields and then clear them.
 |
You can also choose to create a Duplicate email template by clicking on More options and choosing that option. This creates a duplicate of the selected template. This is useful if you are implementing new changes to an existing template (or stock template) you don't want to ruin. Creating a duplicate allows you to play around with the existing template without fear of losing it entirely to saved changes. The duplicate template will be appended with a DUP prefix in dropdown lists (e.g. DUP: Payment Notification). |
Your changes will now be reflected in dropdown lists throughout Method and, upon refreshing the grid, will appear in the Existing Email Templates List.
back to top
How to create a new email template category
Email template categories are used to denote what kind of email template you have created or are editing. Out of the box, Method divides email templates into Automated email, follow-up, call center, marketing and sales templates, but your company may require other designations if you're going to build lots of new templates. To create an email template category, follow these steps.
-
From the New/Edit Email Templates screen, mouse over to the Category drop down list and click on the ellipses button (...) to the right.
-
This will generate the New/Edit Email Template Category screen.
-
In order to create a new email template category, all that is required is a name, so choose one that best describes the category you are creating.
-
Click Save to save the changes to the fields above, or Save & New to save the fields and then clear them.
Your new email template category will now be available in dropdown lists throughout Method.
back to top
How to edit an existing email template category
- Choose the template category you wish to edit from the grid, and click Select. This will pull the selected title into the field at the top of the screen.
- From here you can rename the category (the only editing you can do to an email template category).
- Follow steps 3-4 above to apply your edits.
 |
If you choose to Delete email template category, you will receive a prompt asking if you are sure you want to delete the category. This can't be undone, so make sure it's what you want to do. |
- Click Save to save the changes.
Your changes will now be reflected in dropdown lists throughout Method and, upon refreshing the grid, will appear in the Existing Email Templates Categories List.
back to top
Screen overview
The following is a breakdown of the New/Edit Email Templates screen. We'll take a closer look at each element of the screen (drop down menus, buttons, etc.) so you know exactly what each element does. We hope this will be a useful roadmap for new users!
back to top
Existing Email Templates List
As with most tab links in Method CRM, the Existing Email Templates List is organized by way of a grid (you can learn more about how to navigate grids in Method by checking out our documentation on Grid functionality).
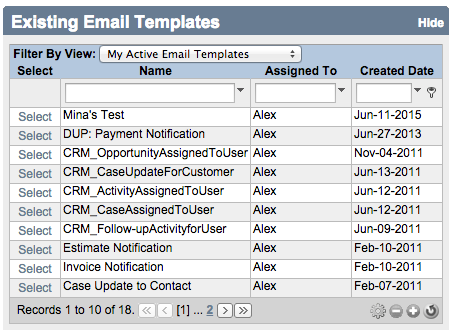
As you can see, this grid features several of the familiar column headers with which you can filter and sort your grid, as well as a few other common features which we’ll go over here.
To the left of each entry you will see a clickable link that says Select. By clicking on that link, Method will populate the fields in the screen to the right that doubles as the New Email Template screen (when none of the fields are populated you can fill them manually and save them as a New Template).
Next, let’s take a look at our trusty preset drop down Filter by view list.
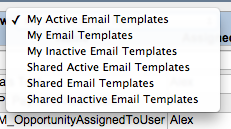
- My active email templates: This view will show you all email templates marked 'active' that are assigned to you.
- My email templates: This view will show you all email templates that are assigned to you.
- My inactive email templates: This view will show you all email templates marked 'inactive' that are assigned to you.
- Shared active email templates: This view will show you all email templates marked 'active' that have been shared with you.
- Shared email templates: This view will show you all email templates that have been shared with you.
- Shared inactive email templates: This view will show you all email templates marked 'inactive' that have been shared with you.
You can also filter and arrange the grid using the headers Name, Assigned to, and Created Date. For more information on how this works, check out our document on Grid Functionality.
back to top
New/Edit Email Template
The easiest way to access the New/Edit Email Template screen is by clicking the More Actions button on the New Activity, New Opportunity, Add/Edit Contact, New/Edit Case and all New/Edit transaction screens, and then clicking Choose email template. From there, click the ellipses button (...) next to any template in the grid, and this will bring up the New/Edit Email Template screen.
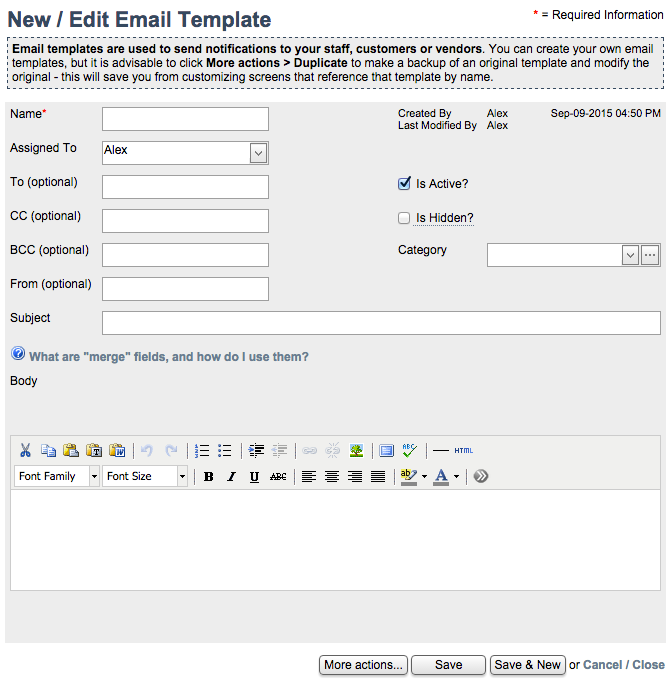
- Name: The only required field on the screen; the name of the email template as it will appear in dropdowns and the Existing Email Templates List.
- Assigned to: The Method user assigned to this email template.
- To (optional): You can assign a specific email to this field; that means the template will be sent to that email address.
- CC (optional): Short for "carbon copy", this field is where you can add additional addresses that will be sent a copy of this email.
- BCC (optional): Similar to CC, this field can also contain additional email address recipients, but they will be hidden from the body of the email.
- From (optional): You can assign a specific email to this field; that means the template will read that it has been sent from this email.
- Subject: Much as in regular email, the subject is the title line of the email. In this subject line, certain values have been included (Company.CompanyName, and Activity.RecordID). For more information on how these values generate information in the email, please see the Mail Merge section of this document.
- Created by: This denotes who created this template, and when.
- Last modified by: This denotes who last edited this template, and when.
- Is active (checkbox): If this checkbox is checked, it means this template is active (available to be used within Method, and viewed in the "active" filter view in grids). If it is not checked, it means the template is inactive (not available for use, and will only appear in the "inactive" filter view).
- Is hidden (checkbox): If this checkbox is checked, it means this template is hidden (will not appear within Method's template dropdown lists). Keep in mind, an active template can be made hidden if you want it to.
- Category: The Category denotation is used for filtering purposes based on which label most accurately reflects the type of template.
- Body: This is the actual body of the email. Depending on the template, there may be information already in this field, including several values related to tables (see Mail Merge for more details). You can edit this section to say whatever you want. For more information on how to use the features of the body field, see the HTML Editor document.
At the bottom of the screen, you will see the usual buttons: More actions, Save, Save & New, and Cancel/Close.
- More actions offers several options:
- Clear/New: This option clears the fields in the screen without saving, preparing the screen for new information to be inputted.
- Delete email template: This option deletes the email template altogether. This cannot be undone.
- Duplicate email template: This option creates a duplicate version of the existing template within the grid to the left. Think of it as saving your work: making a duplicate before you institute changes means you have a copy of the original template saved that you can revert to if you don't like your changes. The duplicate template will be appended with a DUP prefix in dropdown lists (e.g. DUP: Payment Notification).
- Save saves your new or edited template.
- Save & New saves your new or edited template and then clears the fields in preparation for a new template.
- Cancel/Close deletes all your changes (or the new info you put in the fields) and closes the screen without saving.
back to top
New/Edit Email Template Category
The easiest way to access the New/Edit Email Template Category screen is by clicking the ellipses button (...) next to Category.

- Email template category: The name of your new email template category. This is the only field associated with this record.
There are four buttons at the bottom of this screen that should be familiar from other areas of Method. Let's take a look at each of their functionality.
- More actions allows you to Clear/New which will clear the fields in this category and make room for a new one, or Delete the category, which cannot be undone.
- Save saves the information on the screen without closing it.
- Save & New saves the information on the screen and clears the fields to make room for a new one.
- Save & Close saves the information on the screen and closes it.
The Existing Email Template Categories grid works much the same way as other grids in Method, and the information it shows about each activity type mirrors the fields you filled in at the top of the screen.

back to top
| Created on | Jul-17-2013 |
| Last modified on | Feb-17-2016 |